Vector Analysis Software
Table of Contents
You must have Java (JRE v.1.4 or later) installed to run DNAManip. After you have installed Java, download this Zip file and extract it into a folder of your choice; all files must stay in the same folder for the program to function. To use the program, simply double click on DNAManip.jar. Windows users may download an extra executable file that allows for drag-n-drop capability (you may drop a sequence file onto the executable and DNAManip will open it); the executable will also allow you to associate file types with the program, although you must do this manually.
Screenshots
(Not to scale.)
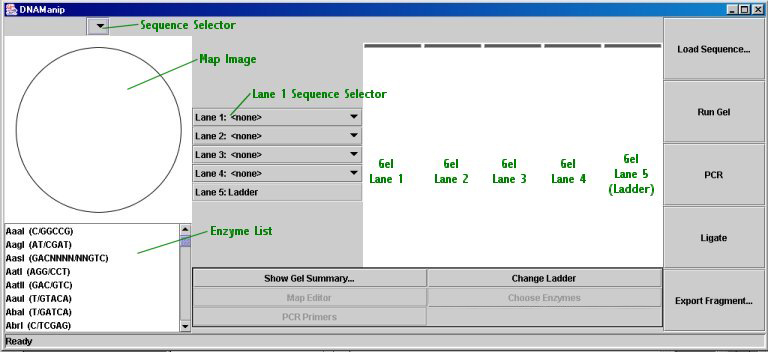
Main Window:
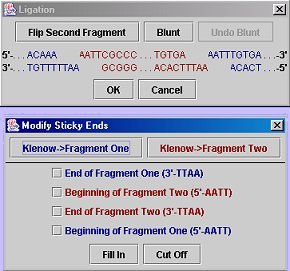
Ligation Dialog with Blunt Dialog open:
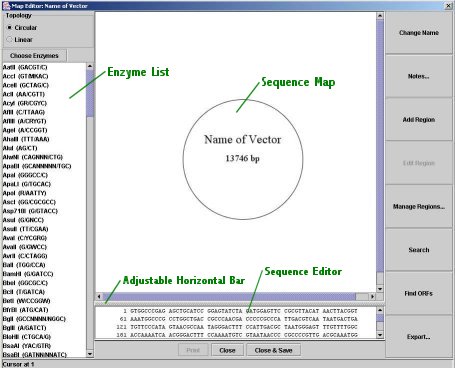
Map Editor:
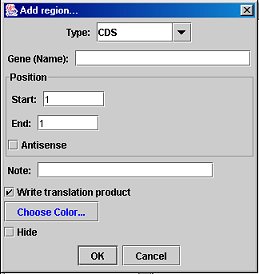
Add/Edit Region Dialog:
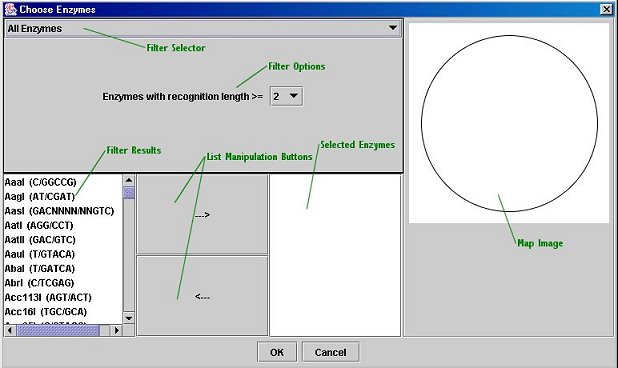
Enzyme Chooser:
Quick Guide to Cloning in DNAManip:
Usage Tips:
Detailed Descriptions
Sequences and the Sequence Selection Drop-Down Menu
Supported filetypes: GenBank, FastA. Note that GenBank files contain region data (i.e. gene locations) while FastA files contain only the DNA sequence.
To load a sequence, click the "Load Sequence..." button; the sequence's name will be added to the drop-down menu. If you load a sequence multiple times, you can perform more than one digest on that sequence; DNAManip will add an n apostrophes after the name of the n-th copy of the sequence (e.g. pBSK, pBSK', pBSK'', etc.).
Small Map Image (displayed in main window)
The map image displays the region map for the sequence selected in the sequence selection drop-down menu above it. Restriction sites are displayed for the enzymes selected in the restriction enzyme list below the image. (To select multiple enzymes, or to deselect an enzyme, hold down the control key while clicking on an enzyme; shift will allow selection of a number of consecutive enzymes.)
If you hold the mouse cursor over the map image for a few seconds, you will see a tooltip describing the location of the cursor: if it is over a region, the region's name will be displayed, and if it is over a restriction site*, the relevant enzyme and cut position will be displayed. *Because restriction sites are very small on the map, it may be a little difficult to position the mouse over them. However, you can always view a complete listing of restriction cut sites using the "Show Gel Summary..." button or by looking in the Map Editor.
Electrophoresis Gel
The gel will run up to four lanes of restriction digests (or non-digested sequences, although they will run as if they were linearized). To 'load' a digest in a lane, just select the desired sequence from the drop-down menu for that lane (note that you can change the restriction enzymes for a digest at any time; just re-run the gel to see the new picture). Lane 5 is always the ladder; the default ladder is 1kb, but you can choose a new ladder by clicking the "Change Ladder" button. Ladder files must be plain text files with fragment sizes separated by hard returns (i.e. one per line).
When you have selected the desired digests to run in the gel, click the "Run Gel" button; you will see an animation (not physically correct, of course) of the DNA fragments migrating down the gel. When the animation has finished, the fragments will be spaced in a manner similar to that of a real electrophoresis gel, to a scaling factor (all lanes are scaled together, so that the largest fragment is at the very top).
When the animation has finished, if you place your mouse cursor over the gel, a tooltip will appear describing either the lane's DNA source (sequence name) or, if the cursor is above a fragment, the fragment's size.
Fragment Scroller: if you press the 'n' key while the cursor is over a lane, it will 'hop' down to the next fragment in the lane. Note that this will not work while the animation is running and that the cursor will move only down a lane, not up it or between lanes. Tooltips will still be displayed after a few seconds of hovering over a fragment, so that one may quickly view all of the (visible) fragments in a lane by repeatedly pressing the 'n' key and waiting for the tooltip to display.
Fragment Selection: Cloning may be performed by selecting fragments (for more information, see below), but just selecting a fragment by clicking on it will highlight (by darkening) the relevant region of the original sequence's map in the small map image. This is useful as a prelude to the "in silico" cloning, to confirm which fragments contain the desired regions.
Show Gel Summary and Printing: The gel summary is a dialog box with a table that shows either cut positions or fragment sizes and allows printing of the gel picture and gel summary. After a gel has run, you may click the "Show Gel Summary..." button to bring up the dialog box. The table defaults to displaying fragment sizes; to toggle between the two display modes, click the "View Cut Positions" button (which then changes into a "View Fragment Sizes" button). To print, click the "Print..." button and select to print the gel, the cut positions, the fragment sizes, or any combination thereof. Click "Continue" and then "OK" (or whatever your printer dialog box says) to print the options you have selected.
Ligation and Exporting of Fragments
A two-fragment ligation is performed using the "Ligate" button, whereas a one-fragment (self) ligation is performed with the "Export Fragment..." button.
Two fragments: Click the "Ligate" button, then select (by clicking) the two fragments on the gel that you wish to ligate. After the second fragment is selected, a dialog box will come up showing the ends of both strands of the two fragments; here you may blunt (either by using Klenow or selecting manually) one or both of the fragments so that their ends are compatible. If you are satisfied with the result, click "OK". If the ends are compatible, a dialog will pop up asking for the name of the new sequence and then where to save it. To view the ligation product, simply load the sequence you saved.
Self-ligation or Exporing a Fragment: Click the "Export Fragment..." button, select (by clicking) the fragment you wish to extract, and then choose the desired blunting options. Click "Linear product" to export the fragment as it would be merely extracted from a gel (and possibly blunted). Click "Circular product" to perform a self-ligation (the program will check for end compatibility before allowing a save). Note that for a linear product, you may not leave sticky ends (this is a constraint of the GenBank format). After the export options have been chosen (and are acceptable), first a naming dialog and then a save dialog will appear.
Exported sequences are saved in GenBank format. Ligations and exports will preserve region data. In addition, the program will record the one or two source sequences of the new file in its notes section.
Polymerase Chain Reaction (PCR), Known Primers
You may perform a Polymerase Chain Reaction on any loaded sequence. If the primers contain nonspecific regions (e.g. restriction sites), they must include an exclamation point ("!") between the specific (original sequence-binding) portions and non-specific (addition) portions. To perform PCR, click the "PCR" button, select the sequence to use, and then enter the primers in the next dialog box. You may type in the primers or import them from FastA-formatted files. When you are done entering primers, click the "OK" button; DNAManip will attempt to locate the PCRed region (if there are any problems, it will alert you) and will calculate the optimal annealing temperature for the PCR. It will then ask you for a name for the new (linear) fragment and then prompt you to save it. The saved sequence will be in GenBank format and will contain the following information (in the notes): that it was a PCR product, the sequence it came from, and the primers used in PCR. Region data will be preserved.
To design primers from the currently displayed sequence, click on the "PCR Primers" button. A dialog will be displayed, allowing you to select primers based on product size or beginning and ending regions within the sequence. DNAManip will then scan the sequence and select primers based on the following characteristics: primer size, melting temperature, GC content, 3' dinucleotide, and dimerization potential. The criteria used to in analyzing the former four properties are customizable in the Primer Design dialog box.
After a list of primer pairs has been generated (this may take some time; please be patient), they will be displayed in another dialog box, allowing you to see where exactly on the sequence they anneal (displayed as black lines on a map picture). You may export this list to a tab-separated text file for import into word processing or spreadsheet software. If you wish, DNAManip will actually perform the PCR for you; to do this, simply select the desired primer pair in the dialog and click "OK". The rest of the process is exactly the same as for manual entering of the primers (see above).
Map Editor
You may open the Map Editor by clicking the "Map Editor" button; this will display the map editor for the sequence selected in the drop-down menu above the small map image (note that it is only available once a sequence has been loaded). The Map Editor allows you to edit many features of a sequence, including its name, its regions, and its actual DNA.
Close versus Save & Close: The "Close" button closes the Map Editor window and does not save changes--it does not alter in any way the sequence file. "Save & Close" does save changes and will alter the sequence file: it overwrites the original sequence file, so that the file is in GenBank format. Certain features of the GenBank format are not preserved, such as references and the accession number. Most other features, such as the regions and the notes (comments), are preserved. DNAManip GenBank files should be fully readable by any other application that uses GenBank files; DNAManip files do contain a few extra features (region colors and selected enzymes, for example), but these should not interfere with the rest of the file. "Save & Close" saves the following: sequence name, selected enzymes, sequence and regions, and region topology. Again, only the "Save & Close" button causes any changes to sequence files; no other option in DNAManip will alter existing files (unless you choose to overwrite an existing file with a sequence you create by cloning).A list of Map Editor options follows:
Topology: You may select whether the sequence is linear or circular (no changes are made to the actual base-pair sequence).
Choose Enzymes: This dialog provides a quick way to select enzymes by their properties (for more information, see below).
Enzyme Selection List: This list functions in the same way as the one in the main window; changes are reflected immediately in the map image.
Map Image: The map image displays regions, restriction enzyme sites, and the sequence's name and length. It also displays highlights from the sequence editor below. It is clickable: clicking on a region or region label selects the region for editing (click the "Edit Region" button) and also selects the region in the sequence editor; clicking on a restriction site label places the cursor at the site's position in the sequence editor. Shift-clicking on any one of the above will cause the sequence editor's selection to go from its current start position to the end of the shift-clicked item. Labels are automatically formatted and placed; no manual editing of position or font are allowed, but you may change a region's color.
Movable Horizontal Bar: You may move the horizontal bar that separates the map image and the sequence editor to view one or the other better.
Sequence Editor: The text box below the map image displays the DNA base-pair sequence, formatted as it would be, for example, in a GenBank file. You may edit the sequence directly here; you may copy and paste DNA sequences as you would in a text editor. Regions are automatically updated to reflect any changes (including deletions). Note that sometimes there may be a slight lag in text editing because of formatting computations.
Change Name: This allows you to change the name of the sequence; if you "Close & Save" the Map Editor window, name changes will be reflected in the main DNAManip window.
Notes: This allows you to add (and see) comments to the sequence.
Add Region: Click this button to create a new region; the region's position defaults to the selection in the sequence editor.
Edit Region: If a region is selected, this button allows you to change the region's properties, including name, color, position, and type. The type drop-down menu is editable; that is, if the desired type is not on the list, you may type one in yourself. You may select the region to be invisible in the Map Editor (if it clutters the view). The "Write translation product" option (available only for CDS-type regions) will cause the amino-acid sequence of that region to be saved in the GenBank file; this does not require the region to be a complete ORF.
Manage Regions: This dialog is a table of all the regions; it allows you to edit any of their properties. You may make visible any invisible regions here.
Search: Use this tool (or ctrl-F) to search the DNA for a base-pair sequence (wildcard characters are allowed); you may search both the 5' and 3' strands. To find the next occurence of the search pattern, just open the search dialog and click the relevant Find button again.
Find ORFs: Clicking this button will start a search for Open Reading Frames within the sequence. After a few seconds, they will be displayed on the map image (if there are already regions in the sequence, the view may become a bit cluttered). The ORF Finder finds non-overlapping ORFs within each direction (i.e. ORFs on the 5' strand may overlap ORFs on the 3' strand, but a 5' ORF will ont overlap a 3' ORF).
Export: You may export the sequence/map into the following file formats:Sequence in FastA (*.s) -- FastA files contain only the name and the DNA base-pair sequence.
Map Image in JPEG (*.jpg) -- JPEG files are a type of raster (non-scalable, possibly "pixelated") graphics; they are quite common in web pages.
Map Image in SVG (*.svg) -- SVG files are a type of vector (scalable, higher-quality) graphics; they are used by many Adobe products.
Map Image in WMF (*.wmf) -- WMF files are another type of vector graphics; they are used by many Microsoft products (such as PowerPoint).
(Note: Adobe and Microsoft products are trademark and copyright their respective owners. Neither I nor my program has any relation whatsoever to these products.)Print: The print option allows you to print the map image, the notes, and the region list (or any combination thereof).
Undo: There is a one-step undo in the map editor, available through the ctrl-Z key; it applies to sequence and region editing (including the ORF finder).
Enzyme Chooser
The Enzyme Chooser is available both from DNAManip's main window and from the Map Editor (note that it is only available once a sequence has been loaded). It allows you to pick restriction enzymes by their properties. To open the dialog, click the "Choose Enzymes" buttons in either the main window or the Map Editor. To use the Enzyme Chooser, select a filter and enter its parameters (and click "Filter" if necessary). The filtered enzyme list will appear on the left. To select an enzyme for use, highlight it and click the "-->" button. You can add multiple enzymes at the same time by simply selecting a more than one enzyme and clicking the "-->" button; in addition, you may use enzymes from multiple filters. To remove an enzyme from the selected list (on the right), click the "<--" button. When you are finished, click the "OK" button to use the list of enzymes you selected; a dialog box will come up asking you if you wish to keep this list for use with other sequences. If you click "Yes", you can save your enzyme list to an external file and then import it (using the "Custom Enzyme List" filter) into another sequence file.
The Filters:
All Enzymes: Use this filter to select enzymes manually; you can restrict the list by the length of the recognition sequence (e.g. NotI's recognition sequence is GC/GGCCGC, 8 base-pairs long).
Custom Enzyme List: Use this filter to import an enzyme list you exported from the Enzyme Chooser earlier. (This option works just like the other filters--you do not need to pick all of the enzymes you import.)
Excise Region: Use this filter to select enzymes that 'excise', or cut at the edges of, a region. Parameters: the number of times an enzyme cuts at the borders (i.e. if it cuts only once or if it can cut twice, once on each side); the 'error' allowable, or how far away from the ends of the region the enzyme may cut; the region itself, which can be entered manually or by selecting a region defined in the sequence; how many times the enzyme can cut outside the region; and how many times it can cut inside the region.
Region Check: Use this filter to select enzymes that cut a certain number of times within a region; this can be useful for checking cloning success and for selecting enzymes that cut only once in a plasmid. Parameters: the number of times the enzyme cuts within the region; the region itself, which can be entered manually or by selecting a region defined in the sequence; and how many times the enzyme can cut outside the region (this would be zero for selecting unique sites within a plasmid).
General Notes about Printing
You can print: an electrophoresis gel, enzyme cut sites (any enzyme combination), cut DNA fragment sizes; and vector maps, vector notes, and vector region lists. The former are available through the "Print" button in the Gel Summary dialog (available from the Main Window), and the latter are available through the "Print" button in the Map Editor.
After you click the "Print" button, a dialog will pop up in which you can select which of the relevant items you wish to print. Click "Continue" to proceed to the printing dialog box.
The printing dialog box is your operating system's own print dialog; please disregard the number of pages ("9999"), as this is not the real number of pages. The program will determine the number of pages it needs to print by itself, and it will print only those pages (usually 1-2). Click "OK" or its equivalent on that dialog to begin the printing process. Spooling should take only a few seconds, and then the printer will begin printing the desired graphics and tables.
The default ladder should be placed in ladder.txt . Other ladders may be placed in any file desired. Just copy any of the ladders below into a plain text file (do not include the ladder name in the file).
1kb Ladder (default)
1221611198
10180
9162
8144
7126
6108
5090
4072
3054
2036
1636
1018
517
506
396
344
298
220
201
154
134
75
Lambda (EcoRI + HindIII)
21226
5148
4973
4268
3530
2027
1904
1584
1375
947
831
564
125
123 Ladder
41822091
1476
1107
861
615
492
369
246
123
Importing Updated Enzyme Lists
Go to REBASE (http://rebase.neb.com) and download (save) the "Type II (tabbed tutput)" enzyme file (or save from http://rebase.neb.com/rebase/link_itype2). Run Import.jar and select the file you downloaded. Your enzyme list is now updated, and you may throw away the file you downloaded; the list will be available when you run DNAManip the next time.
DNAManip is copyright 2002 Mark Hammer. All Rights Reserved. Any other software products alluded to here are trademarks and copyrights of their respective companies. I provide absolutely no warantees or guarantees whatsoever with respect to my program; most notably, Java is trademark Sun Microsystems, Inc. I am not responsible for any damages, emotional, phyical, financial or otherwise, incurred through use (or installation) of my program. If you have any trouble, comments, bug reports, etc., please contact me; I will try my best to help you, but again I provide no guarantees. This program is intended to help, not replace, any responsible laboratory procedures.